Last week I showed you six of the textured rollers from Green Stuff World. This week I painted them up.
All of your base are belong to us!
I painted the six bases using a lot of similar colours, mostly because I wanted to experiment with a limited palette. So, lets have a look!

Stage 1: Prime the base in Black
Stage 2: Drybrush the base with Dark Reaper
Stage 3: Mix 50/50 Dark Reaper/Lime Green
Stage 4: Highlight the edges with Lime Green
Stage 5: Paint the recessed area with Soulstone Blue
Stage 6: Paint 50/50 Soulstone Blue/Ceramite White
Stage 7: Add another 50% Ceramite White to the Stage 6 mix

Stage 1: Prime the base in Black
Stage 2: Drybrush the base with Dark Reaper
Stage 3: Mix 50/50 Dark Reaper/Rakarth Flesh and highlight the edges
Stage 4: Paint Rakarth Flesh on the edges
Stage 5: Paint the recessed area with Soulstone Blue
Stage 6: Paint 50/50 Soulstone Blue/Ceramite White
Stage 7: Add another 50% Ceramite White to the Stage 6 mix
Stage 1: Prime the base in Black
Stage 2: Paint the entire base with Chocolate Brown
Stage 3: Paint the entire base with Agrax Earthshade
Stage 4: Drybrush the base with Chocolate Brown
Stage 5: Mix 50/50 Chocolate Brown/Ushabti Bone and Drubrush the edges
Stage 6: Drybrush Ushabti bone on the edges and raised parts of the base
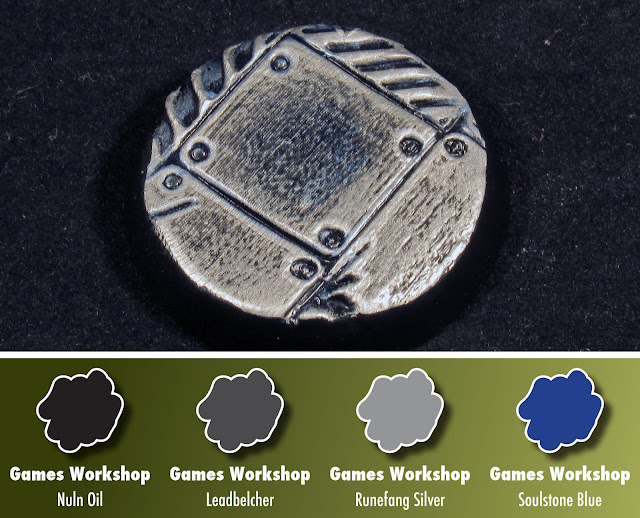
Stage 1: Prime the base in Black
Stage 2: Drybrush the base with Leadbelcher
Stage 3: Paint entire base with Nuln Oil
Stage 4: Drybrush Leadbelcher lightly over the base
Stage 5: Paint Runefang Silver on the edges
Stage 6: Paint Soulstone Blue into the recesses
Stage 1: Prime the base in white
Stage 2: Paint the entire base in two slightly watered down coats of Tallarn Sand
Stage 3: Paint the entire base with Agrax Earthshade
Stage 4: Paint the raised stones with Tallarn Sand
Stage 5: Mix 70/30 Tallarn Sand/Ushabti Stone and edge highlight
Stage 6: Mix 30/70 Tallarn Sand/Ushabti Bone and edge highlight
Stage 7: Paint the edge and larger recesses with Chocolate Brown
Stage 1: Prime the base in White
Stage 2: Paint the recesses with Dark Prussian Blue
Stage 3: Paint the raised areas with Soulstone Blue
Stage 4: Mix 70/30 Soulstone Blue/Ceramite White and paint hatches from the inside, towards the edge of the base
Stage 5: Mix 30/70 Soulstone Blue/Ceramite White and paint as above
Stage 6: Paint pure Ceramite White as final highlights.
Make sure you leave enough of the colour showinf from Stage 4 through to 6. The idea was to make the pieces look transparent, so you can see the frozen water towards the centre.
Round-Up.
So there you have it. Six very different textures to liven your models up. I varnished all of the bases with Army Painter Satin Varnish to protect them, but its up to you whether you do this or not. The wood base would look better in a matt varnish as well, but I think the overall effect works well in a semi-gloss finish.
Tell us what you think?
How did you like this blog? If you have any questions about the painting method, I'd really like to hear from you!


